Friday, May 29, 2009

Award Goodness

I have just been awarded my first ever blog award!! The fabulous soon to be Mrs. J.M. Harrison over at Army Brat Bride gave me the "One Lovely Blog Award". Thanks so much girl! Be sure to check out her blog if you haven't already!
I'm new at this but I did stumble across these rules:

1) Accept the award, post it on your blog together with the name of the person who has granted the award, and his or her blog link.
2) Pass the award to 15 other blogs that you’ve newly discovered. Remember to contact the bloggers to let them know they have been chosen for this award.

Here are the blogs that I have newly discovered (within the last 1-2 months). I apologize in advance if you've already been given this award, but consider your blog that much lovelier if you have!

If you haven't checked out these blogs, make sure you do:

~An Atlanta Bride
~For The Love of Weddings
~My Dream Ring
~Prima donna Bride
~The Bona Fide Preppy Bride
~The Broke-Ass Bride
~The Sweetest Occasion
~Tying The Knot
~With This Ring
~With This Ring, I Thee Obsess
~The Budget Savvy Bride
~Grey Likes Weddings
~Mismikado's Journey Down The Aisle
~An Aqua Juel
~My Disgruntled Life
There you go ladies! Happy blogging! :D

Wednesday, May 27, 2009

More Location Details

As I mentioned in "Our Wedding Date, Photographer and Location!" and in "Good News and a Few Updates", our wedding and reception will be held at Gremmy's Garden Bed & Breakfast.

Back on the 13th, I took Charles over to show him the grounds of the B&B. He'd seen it before but only while driving by on the way to my house. I wanted him to get an idea of what I had in mind and get his thoughts on things too. He absolutely loves the property and is really excited. Which in turn makes me really excited. ;)

Besides showing him the grounds, I also needed to get measurements of the driveway so I know what size tent will fit and I also wanted to get some pictures of the property. Upon measuring the driveway (the only level spot large enough for a tent), we happily discovered that it will fit a 30' x 60' tent perfectly! Thank you Jesus! :) And here are just a few of the pictures I took of the property for your enjoyment! The picture board has descriptions of what the picture is of or what will be placed there for the wedding.

(Source: yours truly-click to view larger)

I haven't been able to show Charles the inside of the house or get pictures yet because Emily and Ron (the owners) have been out of town. However, they'll be back later this week and I'm going to give Emily a call and see about coming by. I cannot wait to show you the gorgeousness that is inside these walls!

Hope

My hope for amazingly incredible engagement and wedding photographs has come true! Yesterday afternoon Charles and I went to meet Wes & Danielle Hope with Hope Photography for the first time! I felt like I already knew them though because I've been a faithful stalker of their blog for months now! lol Seriously, when I first discovered their blog I was mesmerized by their work and spent TWO DAYS going through every single post! I knew I would just love them before even meeting them, their personalities show in their work and posting. And boy was I right, they are nothing short of AWESOME!

However, I was a bit anxious because even though I was fairly confident that Charles would like them I needed to know for sure. In my opinion, it's really important to feel like yourself, feel comfortable, have FUN, and feel at ease with your photographer(s). Without these things, I strongly believe that you don't get the same quality pictures. So it was crucial that Charles like them. No worries though....he LOVED them! Yay!!

I can't even begin to describe how excited I was that a) I signed a contract with the photogs of my dreams, b) that Charles loved them and c) that all this wedding talk really seems REAL now. Charles can testify that after our meeting with the Hope's I turned to him in the car and said "I can't believe we're really going to get married!" He said "When was the first time that it really hit you?" My response..."Right now!" haha This was our first meeting together as an engaged couple planning our wedding and it just really brought everything home.

Besides marrying the man of my dreams, sharing our incredible day with close family and friends, photography is right up there with the most important things for me. I'm on a tight budget and won't be having videography because I simply can't afford it. Photographs last a life time...longer actually. So it has always been my intention to go "all out" when it comes to our wedding photography. Before I even met Charles, I knew whenever I was going to get married that the largest amount of money would be spent on photography.

I'm a huge photography lover period. And dabble in some macro myself. That being said, I know what I want and what I don't want. I want incredible photos that tell the story of our wedding for generations to come. I want all the little details that would be forgotten over time captured in a picture that won't fade like a distant memory. I want all those special moments between my mom, my brother, Leonce (our pastor), Lindsey (my MOH), Javi (my bridesmaid), the flower girls, Charles and his guys and our close family and friends captured so they can never be forgotten. Images of us getting ready for the most important day of our lives. And so much more, I'll stop boring you though. ;)

Enough about all that, on to the details of the Hope's and their incredible work!

Their slogan/motto/compay saying is this: "Where there is love there is hope." Love it! Wes & Danielle are so easy to talk to, so much fun, make you feel at ease and comfortable, and are just plain old awesome people! (And no guys I'm not referring to your age!) Their photography style is along the lines of a photojournalistic (is that a word? lol) and artistic approach. They don't have a studio, they rarely pose pictures (and the ones that are don't look posed!), they capture moments as they happen naturally on their own and I love all of those things! I seriously couldn't have imagined being so blessed as to have them shoot our special day.

The package I selected contains the following:
- 8 hours of coverage by 2 photographers and an assistant
- Online gallery for 60 days
- Spiral bound proof book (most amazing looking proof book I've ever seen!)
- Engagement Session (includes online gallery and spiral proof book)
- 9.5 x 9.5" Fine Art Book (30 pages)
Plus, I'm adding the cost of a CD with all the engagement session photos with written consent to print them anywhere we like. (I'll talk about this again at some point because it has to do with our guest book.)
I'm getting all this for under $4,000.00!!

After the wedding we will get the Wedding DVD that has all the images from our wedding with written consent to print them anywhere we like. And I imagine we'll also be ordering some albums to use a gifts.

In all the research I've done regarding wedding photographers, it is unheard of to get TWO photographers and an assistant for 8 hours, plus the engagement session, proof books and an album for so little! I've seen some photographers whose packages begin at over 4k! I am ecstatic and cannot wait to shoot our engagement pictures and then have them shoot our wedding next year!

And now for some photos!!! (Click on the boards to view larger. All photos from Hope Photography.) Our photographers Wes & Danielle Hope:
(Source)

Some of my favorite engagement session shots:


Some of my favorite wedding shots:
(Source)

Don't Wes & Danielle look like a ton of fun from their pictures!? And their work is to die for! Plus, how can I not love someone who wears a purple shirt in honor of me and keeps up with my wedding blog!? Thanks Danielle! I couldn't believe it when you told me you keep up with this. You're a mother of two precious little girls, a wife and have a full time job! When do you possibly have time to read my blog? lol

Charles and I couldn't be more excited to be working with you! May 2010 will be here before we know it! :)

So what do you think of their work?

Wednesday, May 20, 2009

Save-the-Dates

I absolutely REFUSE to call them STD's. I just can't do it. lol

Our save-the-dates will be sent out via e-mails. Why? First and foremost, budget limitations. I just simply cannot afford to create paper save-the-dates and then spend all that $$$ on postage for them. Most everyone that we will be inviting to the wedding has an e-mail address and uses it frequently so e-mail is the way to go for us!

I realize that our wedding is still 11 months out and it may seem a little early to be sending out a save-the-date e-mail. However my family (close and extended) and close friends that will be invited will have to travel to the wedding. They also have very busy schedules and plan out as far as a year in advance! So...in our case, we need to get these babies out as soon as we can!!

So yesterday I sat down and started designing some save-the-date graphics that we can put in the e-mails to get the word out. Just like with my Flickr Cards, I had no vision or ideas for the design of the graphic. I just set to work and let my creative juices flow and these are the options I ended up with:
(Source: yours truly)

I created these graphics from scratch, no part of them was taken from anyone else or any other image. As you can probably tell, the top designs were my first attempts and as you work your way down, my last. I would love to be able to wait to send these puppies out until after we have an engagement photo session and get the pictures back, but there's no way I can hold off. So, I rummaged through my pictures of the two of us and found two of my favorite images (and also realized we need more pictures of us together). I still have to show these images to Charles (doing that tonight) so that I can get his input on them since his mug is on them too! But before consulting with him #5 is my absolute favorite! We're dressed up a little more in this picture and the day it was taken was fantastic! Back in October, Charles took me on a train ride on the Great Smoky Mountain Railroad. I'd never been on a train before and it was so awesome!

If you enlarge the picture, you'll be able to see the design elements better. If you notice our wedding website address feel free to check it out. I'll blog about it soon but it's not done and I was waiting to blog it until it's complete. Which save-the-date design do you like best?

Are you sending out your save-the-dates via e-mail or snail mail?

Thank You, Thank You Very Much

Couldn't help but steal some Elvis words for this post!

Again, I'm breaking the away from what's normally done with stationery. Usually everything coordinates perfectly. From invitations, programs, shower invites and table numbers to escort cards and seating charts. But when you're working on a really tight budget you just don't have that luxury...at least I don't. Not to mention that I DON'T CARE if my stationery items don't match! I like no, I love each and every thing I've bought to date and have managed to keep at least one thing consistent with all items...PURPLE.

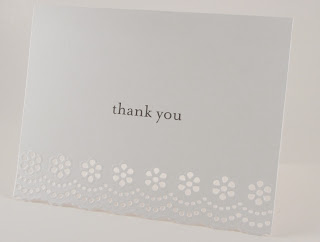
All this jibber jabber brings me to my thank you notes. I found them at Wal-Mart in the craft department and again....they were ON SALE! Woo! I love how when I'm not looking for wedding related stuff I just stumble upon it...and find great deals too! They are from Martha Stewart (her wedding line). Who I will admit at one time I absolutely could not stand. However, since her little stay at "Camp Cupcake" I find her much more enjoyable to watch...she's just not so anal about everything anymore and frankly she was a b**** before her stay there! :D

Anyhoo, back to the thank you notes. They were originally priced at $10.96 per 40 pack. However, I happened to find them on sale for $7.99 per 40 pack!! I bought all four packs they had. They are from her wedding Eyelet collection. I had been scouring the net to find thank you notes that I liked and were within my budget but it just wasn't happening. I wanted something unique, something with more eye pleasing details to it than just a while piece of card stock with the words "thank you" on it. These thank you cards are exactly what I was looking for and I was able to turn them into a little DIY project to add some purple to them too! So without further adieu here they are!

This is what they look like straight out of the box. (Source: yours truly)

Eyelet detail. (Source: yours truly)

And this is what they look like now that I'm done with them! (Source: yours truly)

New eyelet detail! (Source: yours truly)

How'd I do it? It was so simple! Just measure the width of the cards and then the height of the eyelet design and cut paper strips (of your color choice) to those dimensions. Then take a handy dandy double sided tape runner and place some tape at each end and in the middle of the strip and place it on the inside bottom of the card. Don't place it directly behind the eyelet design or your tape runner strips will show through...and yes, even if you use clear it will show! That's why you adhere the strip to the bottom of the thank you note. You get the pop of color through the eyelets and then it's still there when the invitation is open.

Cutting the paper strips. (Source: yours truly)

Applying the tape runner. (Sorry it's blurry!) (Source: yours truly)

I love how they turned out. With the addition of the purple behind the eyelet design I think it looks so much better and makes the detail of the eyelet pop! I got this simple little DIY embellishment project done in about an hour and a half. And I incurred no additional cost because I had the purple paper on hand already! So what do you think? I adore them! :)

Are you finding some of your wedding related items when you're not even looking?

Monday, May 18, 2009

Priceless Photos

I love the new idea of Flickr photo sharing cards! I first stumbled across the concept over at www.weddingbee.com. Miss Candy Corn, Miss Cream Puff, Miss Lemon, Miss Penguin and so many others created Flickr accounts and photo reminder cards so their guests could share their pictures with them after the wedding! How awesome is that!?

As a photography lover, I want to be able to see the photos that our guests are able to capture at the wedding. They are scattered in many different locations and can capture different angles, scenes and moments that our photographer won't be able to get; because lets face it, they can't be in every single place...as much as I wish they could be. ;)

Back at the beginning of the month I sat down and designed our Flickr cards from scratch. Because I'm poor and can't afford Photoshop, I used PowerPoint. I have discovered that working in PP on a Mac opens up a lot more editing options than you have when working with it in Windows. Here's what I came up with, the first image is the front of the card and the second is the back. Remember you can view the images larger by clicking on them.

(Source: yours truly)

(Source: yours truly)

When I sat down to design the cards, I had no vision as to what I wanted them to look like. I was just going to play around a bit, maybe come up with a few different options and see which one I liked most. This was my first and only design and I just love how it came out!

The tree design came from the kiss the groom. They have this thing called The Kissing Tree...you should really go check it out! It's a generator that places your text in the heart on the tree. So cool! I found it on another brides blog a while back but I can't remember which one, I loved it instantly and made a lot of trees.

For the Flickr card though I had to use a photo editing program to erase what the kissing tree placed inside the heart. The text I wanted there wouldn't fit using their site so I did it myself. It's kind of hard to read in the image but in the tree it says "Kristal & Charles May 1, 2010". And the top quote says "A great photograph is a full expression of what one feels about what is being photographed in the deepest sense, and is, thereby a true expression of what one feels about life in its entirety. ~ Ansel Adams" I've seen lots of flickr cards with the popular quote "A picture is worth a thousand words" but I wanted something different...hence the Ansel Adams quote.

I'm still undecided about how I'll get the cards to my guests and if I'll embellish them with any purple ribbon but I have time to figure those things out. If you have suggestions though let me know!

What do you think of my card design? Have you created a DIY project with no vision in mind and totally fell in love with your first attempt?

Get With The Program!

In addition to getting my bubbles and invitations at Michael's while I was on vacation back in early March, I also scored our ceremony programs! As I did with our invitations, I changed the color of ribbon used on the programs so it coordinates with our colors. And just like I did with the new ribbon for the invitations, I got it all cut to length while I was on vacation. A number of weeks ago, I decided I would go ahead and tie it around the programs so that's done too. When it's time to print the cover of the programs, I can just slide the ribbon off, print and then slide it back on. Here's what the sample program looks like with the purple ribbon I added (it was originally white).
(Source: yours truly)

I didn't get a picture of the inside of the program because until I design and print them, there's nothing to see. However, the kits from Michael's came with inserts for the inside of the programs and I plan on using them because I think it gives the programs a nicer more elegant touch.

The cost you ask? I'll have to check my receipts when I get home but I believe the original price on them was $15.99-20.99 (I can't remember but it was somewhere around there). They were on clearance for around $11.99 I think but they rang up at $9.99 per box of 40! And the ribbon I bought was on sale for $0.33 a spool! Unfortunately I didn't keep up with how many spools I used so I can't do a price breakdown including the new ribbon but I still think it was a steal and I love how they look!

I know the programs don't match our invitations but because of the price I couldn't pass them up and I was still able to incorporate our main color; purple.

Did you opt for a program design that doesn't perfectly coordinate with your invitations and other stationery?

Thursday, May 14, 2009

DIY Centerpieces!

Believe it or not, I've already started working on the centerpieces for the reception tables! Yes I suppose I am crazy since the wedding is over 300 days away! lol But since I have the time and the materials I'd be a fool not to get what I can done now rather than wait. I'll have my hands full closer to the wedding. My mom's running joke is that I'll have everything done and planned out two months before the wedding and will then have nothing to do! lol And honestly, she's probably right or at least close. When I have things I'm working on for a big project they eat at me till I can get them accomplished. You have no idea how hard it is not to get the invitations done now! lol But I'll wait on those as hard as it is. Anyways on to the centerpieces!

I originally wanted to do submerged centerpieces. I love the look of them! Plus, they make a big statement without having to use tons of flowers...which is ever so helpful on the budget. Here's a picture of a submerged centerpiece I love.
(Source: unknown)

As much as I love the look of submerged centerpieces it soon became clear to me that I wouldn't be able to incorporate them. Why? Because of budget reasons, time and labor. My mom is doing all my floral decor including the bouquets. I read on a florists blog that submerged centerpieces have to be put together the day of the wedding at the wedding location to avoid messing them up. This picture got my attention and I instantly fell in love with the look.
(Source)

But how on earth would I recreate something even close to that!? There's no way I can afford orchids...as much as I'd love to be able to. While browsing Save-on-crafts.com my vision came into being with my mom's help. Here is my completed vision:
(Source: yours truly)
What do you think? I absolutely LOVE them!!!!! I am so glad that what mom and I had envisioned in our heads really worked and looks so amazing, stunning, beautiful, and expensive!

So now I bring you the materials list and step by step instructions on how I made my centerpieces.

(Source: yours truly)
Materials Needed:
A) Clear Glass Cylinder Vase 10 1/4" tall and 3 1/2" in diameter.
B) Natural Curly Willow Branches 27 to 30" long.
C) Purple & White Preserved Orchid Blooms 2 1/2" wide (3 blooms per vase).
D) PVC Grass Onion Bush 24" tall.
E) Glass Nuggets of your color choice (mine came from Michael's but they no longer carry this purple color).
F) Natural Sheet Moss 1.5 oz. bag (make sure you get natural and not artificial).
G) Mini Glue Gun and glue sticks (not pictured).
H) Scissors (not pictured).
I) 7" Round Centerpiece Mirror (not pictured).

(Source: yours truly)

Instructions:
A) Cut curly willow branch to just under the height of the vase (9.5 - 10 inches).
B) Cut two pieces of grass from the bush.
C) Curl the grass using scissors (keep them closed), just like you would curl curling ribbon.
D) Place enough glass nuggets in the bottom of the vase to cover the bottom and allow for the willow branch to stick down in them.
E) Using a mini hot glue gun glue an orchid bloom into place on the willow branch. You decide on where and at what angle to glue the bloom, it's entirely up to you. Start either at the base or top of the branch though when placing the first bloom.
F) Let the glue set for a few seconds and then place a small pinch of the sheet moss over the glue. Make sure you can see no hot glue and be careful not to burn your fingers! Tweezers can be used to aid in this process.
G) Repeat steps E and F two more times placing the remaining blooms on the willow branch. Again, it's up to you to decide on where to place them, how to angle them and how much space to leave between each bloom. (My centerpieces will be going on round tables at the reception so I tried very hard to make it so each of the blooms faced a different direction. This allows every guest to see a bloom no matter where they're seated at around the table. In picture "G", I rotated the branch three times to show this.)

(Source: yours truly)

Once you've followed the above instructions, you can do the next step in whatever order you find to be easiest.
A) Place your willow branch with the blooms inside the vase and insert (on at a time) the curled grass. You decide on how you want it to look. (I chose to stick the end of the grass into the glass nuggets and then let it curve around the inside of the vase. I tried to get one piece of grass to start from the base on both the left and right side.)
B) Then repeat with the other piece of curled grass.
This part can be a little frustrating and tricky because there isn't room to get your hand into the vase once the willow branch is in place. You may find it easier to put the grass in first and then put the willow branch in.
C) Sit back and admire your work!!!
Note: I prefer that the top orchid bloom not stick out above the top of the vase so if yours does just cut off a little more from the bottom of the willow branch to shorten it. *If you have any questions about the DIY process feel free to leave me a comment or send me an e-mail!

When I placed my order with Save-on-crafts, I was initially worried about how fragile the orchid blooms would be. However, they stand up pretty well when working with them. I didn't have any break while putting them together. I will say though that you need to order a lot more blooms than you really need because through shipping, some of them get the tips broken off.

COST BREAKDOWN FOR ONE CENTERPIECE:
1) Cylinder Vase $3.99
2) 7" Centerpiece Mirror $1.12
3) Glass Nuggets $0.50
4) Curly Willow Branch $0.33 (it's actually less than that because you don't use the whole branch for one centerpiece)
5) 3 Preserved Orchid Blooms $1.26 ($0.42 per bloom)
6) 2 Pieces PVC Grass $0.0093124 ($0.0046562 each piece of grass, $1.49 a bush w/ 320 blades of grass)
7) Natural Moss $0.12 ($2.99 for a 1.5oz bag-I'm making 24 centerpieces so I divided 2.99 by 24 to get the price.)
GRAND TOTAL PER CENTERPIECE:
$7.33!
Note: I already had the hot glue gun and glue sticks on hand so I didn't incur a cost for those.

I cannot believe I was able to use real orchid blooms (although they aren't fresh they're real!) in the centerpieces. I absolutely love how they turned out and I'm so glad I was able to make them myself! And the best things about them....the cost was low, they can be made in advance and I can give them to special people as gifts if I so choose, sell them or use them to decorate! LOVE THEM!! :)

So let me know what you think...Do you like how they turned out? And can you believe I made each one for under 8 bucks!?

Did you have a DIY project that saved you a ton of money and turned out exceeding your expectations?


Wednesday, May 6, 2009

You're Invited

To see what my wedding invitations look like!

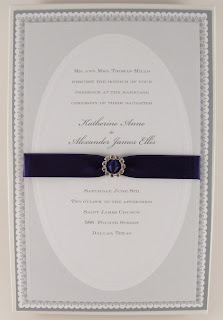
Along with the bubbles I talked about in Where To Start, I found my invitations at Michael's back in March when I was on vacation. When I saw them I couldn't believe my eyes. They were on sale for $29.99 (regularly $39.99) for a box of 40. Which includes printable invites and response cards, invitation backers, ribbon, rhinestone buckles, adhesive tabs and envelopes for the invitations and response cards. I couldn't believe it, they were perefect. The only thing that I wasn't too crazy about was the ribbon color. It was silver and while beautiful and one of my colors, I just had to have purple somewhere on my invitations. But with a little DIY project I could easily change the ribbon. I quickly snatched up all the boxes they had and began my search for the perfect ribbon. Thankfully that didn't take long. I found the perfect width and the perfect color of purple!

Here's what the sample invitation looks like that comes assembled in the box:
(Source: yours truly)
The invitation is stunning just the way it comes in the box but I wanted to add my pop of purple to it because it's my main color. Do you think they're amazing the way they come?

Here's what the sample looks like with the purple ribbon in place of the silver ribbon:
(Source: yours truly)
And a few detail/closeup shots:
(Source: yours truly) (Source: yours truly)

I love them to pieces. They are so elegant and beautiful! And they reflect my colors and theme so well!

Once again I took advantage of being on vacation and not having a schedule to stick to and I cut all the purple ribbon to the proper lengths for all of the 250 invitations. So that's another DIY project I was able to get done before even getting engaged. I can't assemble the invitations for a while though because the top sheet has to be printed before assembly can begin. But at least I have one less thing to worry about come time to assemble them.

The response cards are two to a sheet and this is what the sample looks like:
(Source)

I sent one to myself in the mail to see if one stamp would be enough postage and to see how they did going through the mail. It came back to me in pretty good condition and it was enough postage! I've already bought 500 forever stamps so that I could save some $$ on them before they go up in price yet again. Plus, they could go up more than once before I'm ready to send them out. I'm not picky about what kind of stamp goes on the invitations and response cards because it's not the stamp that matters, it's the invitation that's inside. However since then I decided I needed to go ahead and invest in second envelopes for them so they had a little more padding and protection. Hopefully doing so will not make them more expensive to send. I'm also going to see if they will still hand cancel mail.

So what do you think about the invitations?

Have you bought stamps for your invitations and/or response cards before the price on postage goes up?

The Look for the Guys

Yesterday evening the Mr. and I went on over to our local S& K Menswear store to solidify my vision for the guys. The gentleman working when we went in was so helpful! As I mentioned in Men's Attire, I had no idea what kind or color shirt the guys should wear. I already knew what suit I wanted them in and have already bought the ties they'll wear. Rob (the guy at S&K) was very honest with me about what color shirt would look best with the suit and tie I had picked out. He didn't tell me to pick whatever I wanted because it's my wedding, he told me truthfully what he thought would be best and I was very thankful for that!

He even went so far as to partly undress two mannequins so we could really visualize the look we were going for. He put one of our ties on a mannequin that had on a black shirt and then placed the gray suit coat over it. And let me tell you, it looked SHARP and different/unique too! (Silly me forgot to take the camera so I could really show you what it looked like. sadness.) Anyways, here is what the suit and black shirt will look like together.
(Source)

Now picture that paired with the ties I bought for the guys.
(Source: yours truly)
I know you have to use your imagination a little to be able to visualize but what do you think?

We decided against a vest (even just for the Mr.) because it was going to add another color and texture and I was afraid it would look too busy. Plus, I think he'll be more comfortable without one.

The Mr. was a little surprised at the price tag for the tux rental but it doesn't seem bad to me. Yeah it is a little more than it would have been because the shirts I want are considered an upgrade and you have to pay an extra $10 for them. And the shoes I picked out are also a $10 upgrade. But again, the total which comes to about $200 (including tax) doesn't sound unreasonable to me.

In your opinion, is $200 too much for a tux rental that includes the suit, shirt and shoes? (It also includes a vest and tie but we won't be using those.)

Tuesday, May 5, 2009

P is for Powers

Yesterday our cake topper monogram came in the mail! Woo hoo!! It is even more beautiful than I could have imagined! I found it for an incredible price at the Elegant Bridal Shop on Ebay. If your looking for a stunning cake topper, bouquet embellishments, cake servers, etc be sure to check out their shop! I highly recommend them!

(Source for above photos: yours truly)

Isn't it stunning?? (These pictures do not do it justice!)

Monday, May 4, 2009

Men's Attire

I am not afraid to admit that I know nothing when it comes to menswear. And believe me, I mean NOTHING. So, on Tuesday me and my Mr. are heading to our local S&K Menswear store to see what they have and get some pointers on finishing the look I'm going for.

Ok, the look I'm going for with the guys is a medium grey suit. I like this look from After Six:
(Source)
This suit is called Catalina and is a 31.5" 2 button single breasted self notch coat with a self top collar, flap pockets and no vent. Matching pants (as shown) are available. The fabric is a 55/45 polywool blend. I also like the look of the grey vest (as shown) with it but would only have my man in the vest and not the other guys.

I also like these looks I put together using the S&K Menswear Build-A-Tux feature. Please ignore the ties that are shown because it doesn't give you the option not to choose a tie and I've already bought the ties for the guys (more on them later in this post). Also remember I'm clueless about menswear so I have no idea what kind or color of shirt I'm looking for.
This would be the general look for the guys except with the ties I purchased. And again, I'm going to have to get pointers from the S&K Menswear staff about what kind and color shirt to have the guys wear. (Source)
This would be the general look for my Mr. Except the vest color would match the suit and he would be wearing the tie I bought him. And yet again remember what I said about the shirt. (Source)
Here I played around with a black shirt since I have no idea what to pair the suit and tie with. (Source)

And without further delay, the ties I found at Kohls for $16.80 each regularly $28.00 each. I wasn't on the search for ties at Kohls when I found them. However, I fell in love with them once I saw them. They are perfect and just what I had been scouring websites trying to find (with no luck I might add). The ties feature both of our wedding colors, purple and silver. I am so glad I went ahead and bought them even though I got puzzling looks from the Mr.!
These are the ties for the best man, groomsman and my brother.Close up of the wedding party ties. Aren't they pretty? :)
And this is the tie I found for my Mr. I wanted his to be a little different so he would stand out from the other guys. This tie was perfect because it has the same colors as the other ties and the same pattern but it's still different.
Close up of the Mr.'s tie.And this picture shows all the ties and the differences between the two styles. I absolutely love them! (Tie Pictures Source: yours truly)

On to the socks. I haven't bought these as of yet. I found them online at Banana Republic and really like them. I totally stole these socks from JessicaLynn over at Tying the Knot. I had been on the hunt for purple argyle socks and was having no luck at all and then I stumbled on her blog and found the socks I'd been looking for. Me and the Mr. are going to a local Banana Republic Outlet store on Tuesday to see if we can find the socks there so we won't have to pay shipping. And hopefully we'll find them there cheaper too!
(Source)

Why I care so much about what kind of socks my guys wear:
I love sock shots like that one! I know, I know, I'm crazy. :P
(Source)
And now for the shoes. I'm not too picky here. They just need to be nice looking, shiny, black and comfy for the guys. Something along the lines of this shoe:

(Source)

Are you clueless about how to dress your guys? What look are you going for with the groom and groomsmen?

Up next: the stationery.

Where Do I Start?

I have sooo much to post about that I'm not even sure where to start! lol I don't want to overload you guys but you have to understand that I've had tons of ideas stuck in my head and now they can finally come out! I guess this will be a kind of random post so just hang in there. :)

Over the weekend, I was finally able to get the supplies I needed to be able to make my DIY Light Box. It was really easy to make and as a result, I've got tons of pictures to share with you. If you're interested in making a DIY Light Box just check out this tutorial. The only thing I did differently was use a hot glue gun to glue the interfacing fabric to the box so I wouldn't have to worry about it sliding off. I highly recommend doing that if you decide to make a light box and use if often.

So now on to the pictures!

As promised in More Purple and More Sparkles, I have some more pictures of the brooch I will be using on my bouquet.
(Source: yours truly)

Next I'll be showing off the gorgeous earrings I found when I got my dress! I absolutely love them and cannot wait to wear them!
(Source: yours truly)

Next up...my bubbles! I found these at Michael's back in March while I was on vacation with mom and snatched them up! I bought 6 tubs of 36 wands for a total of 216 bubble wands. I also bought some purple ribbon to tie around the tops of the wands to give them a personalized look and to incorporate my main color. No, I wasn't engaged yet when I got these but I'm really glad I bought them when I did. They seem to be really popular and Michael's has trouble keeping them in stock in large quantities. While on vacation enjoying doing nothing much but going to the beach and relaxing, I went ahead and put the ribbon on all 216 wands! That was awesome because I was able to get that DIY project out of the way so I won't have to worry about it now!

Why I want bubbles instead of rose petals, rice, confetti, sparklers, etc...because you get pictures like this one!
(Source)
What the bubbles look like when you buy them:
(Source)
And what my bubbles look like now that I'm done with them:
(Source: yours truly)
I found the wands looked nicer with the ribbon around the base of the "love knot" instead of through the "love knot". I simply wrapped the ribbon around the base of the love knot and double knotted it once. I didn't think it was necessary to knot it twice as I believe once will hold just fine. I love how they turned out!

Ok, I think that's it for this post.

Are you using bubbles, sparklers, rice, birdseed, confetti or something else for your send off?

Up next: I'll give you a look at what I'm thinking of as far as the guys attire is concerned.