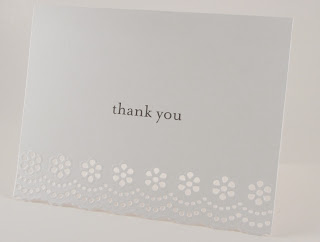
Again, I'm breaking the away from what's normally done with stationery. Usually everything coordinates perfectly. From invitations, programs, shower invites and table numbers to escort cards and seating charts. But when you're working on a really tight budget you just don't have that luxury...at least I don't. Not to mention that I DON'T CARE if my stationery items don't match! I like no, I love each and every thing I've bought to date and have managed to keep at least one thing consistent with all items...PURPLE.
All this jibber jabber brings me to my thank you notes. I found them at Wal-Mart in the craft department and again....they were ON SALE! Woo! I love how when I'm not looking for wedding related stuff I just stumble upon it...and find great deals too! They are from Martha Stewart (her wedding line). Who I will admit at one time I absolutely could not stand. However, since her little stay at "Camp Cupcake" I find her much more enjoyable to watch...she's just not so anal about everything anymore and frankly she was a b**** before her stay there! :D
Anyhoo, back to the thank you notes. They were originally priced at $10.96 per 40 pack. However, I happened to find them on sale for $7.99 per 40 pack!! I bought all four packs they had. They are from her wedding Eyelet collection. I had been scouring the net to find thank you notes that I liked and were within my budget but it just wasn't happening. I wanted something unique, something with more eye pleasing details to it than just a while piece of card stock with the words "thank you" on it. These thank you cards are exactly what I was looking for and I was able to turn them into a little DIY project to add some purple to them too! So without further adieu here they are!
 Eyelet detail. (Source: yours truly)
 And this is what they look like now that I'm done with them! (Source: yours truly)
 New eyelet detail! (Source: yours truly)
How'd I do it? It was so simple! Just measure the width of the cards and then the height of the eyelet design and cut paper strips (of your color choice) to those dimensions. Then take a handy dandy double sided tape runner and place some tape at each end and in the middle of the strip and place it on the inside bottom of the card. Don't place it directly behind the eyelet design or your tape runner strips will show through...and yes, even if you use clear it will show! That's why you adhere the strip to the bottom of the thank you note. You get the pop of color through the eyelets and then it's still there when the invitation is open.
 Cutting the paper strips. (Source: yours truly)
 Applying the tape runner. (Sorry it's blurry!) (Source: yours truly)
I love how they turned out. With the addition of the purple behind the eyelet design I think it looks so much better and makes the detail of the eyelet pop! I got this simple little DIY embellishment project done in about an hour and a half. And I incurred no additional cost because I had the purple paper on hand already! So what do you think? I adore them! :)
Are you finding some of your wedding related items when you're not even looking?
 Cutting the paper strips. (Source: yours truly)
 Applying the tape runner. (Sorry it's blurry!) (Source: yours truly)
I love how they turned out. With the addition of the purple behind the eyelet design I think it looks so much better and makes the detail of the eyelet pop! I got this simple little DIY embellishment project done in about an hour and a half. And I incurred no additional cost because I had the purple paper on hand already! So what do you think? I adore them! :)
Are you finding some of your wedding related items when you're not even looking?


No comments:
Post a Comment